 Strangelight Audio
Build a synth
Build a complete synth in Throughline Synth, one lesson at a time. Lessons 1 to 3 give you a playable polyphonic synth. Two optional extensions add an arpeggiator and a tempo-synced delay.
Each lesson starts from a checkpoint patch and ends with one. If a step goes wrong, import the lesson's starting checkpoint and try again. To import a checkpoint, open the Patch menu, choose Other…, click Import and pick the downloaded file. See Save, load and reuse.
You connect sockets by dragging from an output (right side of a node) to an input (left side). Editing and navigation covers adding nodes, connecting, selecting and zooming.
Before you start
This tutorial starts from an empty patch, so keep your current work first:
- Save your DAW project, or export the patch as described in Save, load and reuse.
- Open the Patch menu (the patch name in the toolbar) and choose New. Throughline Synth loads its Init patch.
- Click an empty part of the canvas, then press Cmd+A (macOS) or Ctrl+A to select every node.
- Press Option+Shift+Delete (macOS) or Alt+Shift+Delete to delete them.
Every node goes except Audio Output, which a patch always keeps.
Starting checkpoint: build-a-synth-start.tlpatch
Lesson 1: Build a playable voice
A voice turns each MIDI note into a tone with a start and an end. You need five nodes: the note's pitch sets the oscillator, and its gate drives an envelope that opens and closes a VCA.
- Click Add node (the + at the top left), type
MIDI Inputand choose MIDI Input. Click the canvas to place it on the left. - Add MIDI Decode, Oscillator, ADSR and VCA the same way, from left to right. Leave room above or below each node for cables.
- Make these six connections:
| From | To |
|---|---|
| MIDI Input · MIDI Out | MIDI Decode · MIDI In |
| MIDI Decode · Pitch | Oscillator · Pitch |
| MIDI Decode · Gate | ADSR · Gate |
| Oscillator · Signal | VCA · Signal |
| ADSR · Envelope | VCA · Gain |
| VCA · Signal | Audio Output · Audio In |
Keep the default settings: a Saw waveform and ADSR Attack 10 ms, Decay 200 ms, Sustain 70% and Release 300 ms.
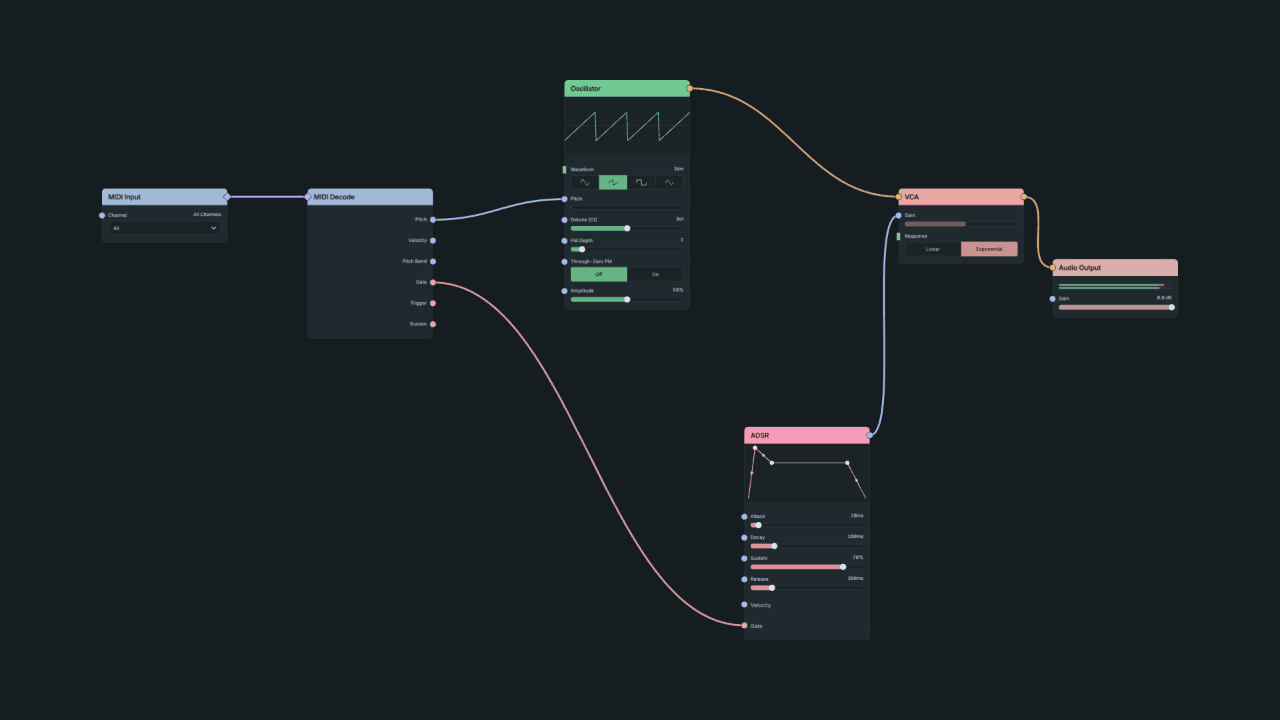
Result: each key plays its own pitch. The note starts as soon as you press the key and fades to silence about 0.3 s after you release it.
If a note never stops: the Oscillator is probably reaching Audio Output without passing through the VCA, or ADSR Envelope is not connected to VCA Gain. Check the last three rows of the table.
Checkpoint: build-a-synth-playable-voice.tlpatch
Lesson 2: Shape its tone
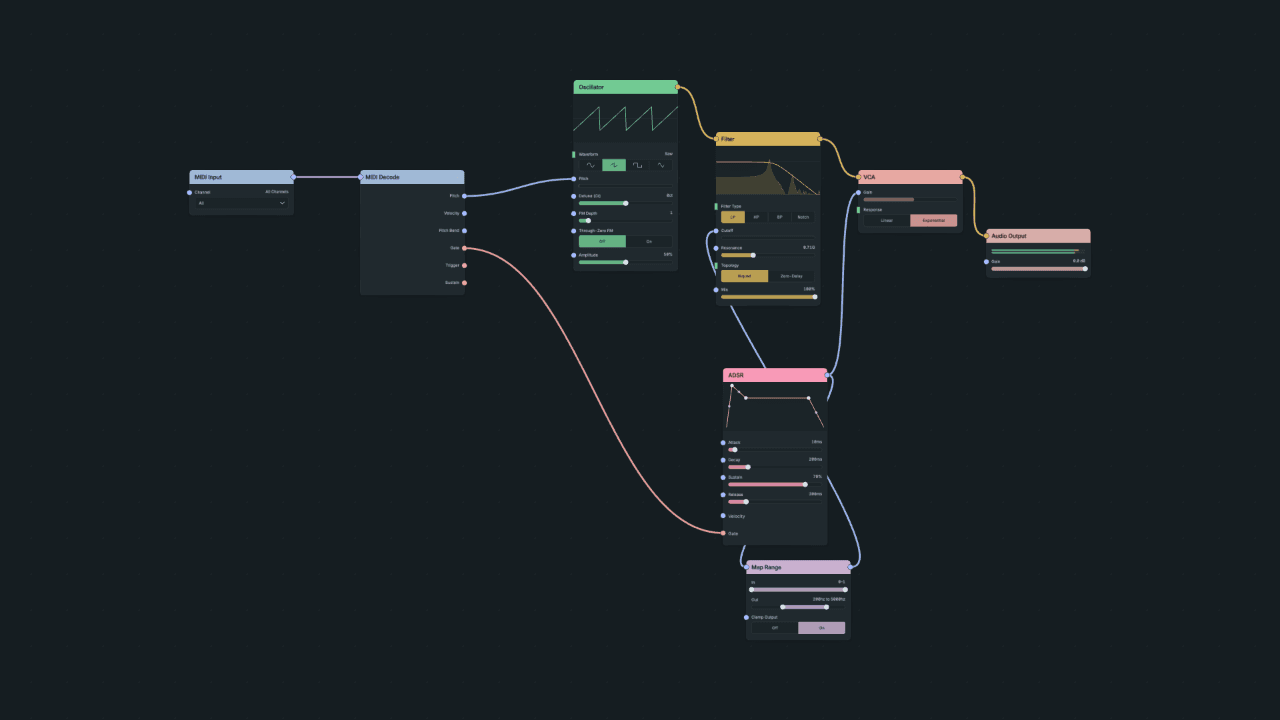
Make each note start bright and settle darker, like a plucked string. A Filter removes high frequencies, and the same envelope that sets the level moves the filter's Cutoff.
- Zoom in until a + appears in the middle of the cable from Oscillator to VCA. It appears from 65% zoom.
- Click the +, type
filterand choose Filter. The Filter now sits on that cable: Oscillator Signal goes to Filter Audio In, and Filter Audio Out goes to VCA Signal. - Drag from ADSR Envelope to an empty part of the canvas and release. In the menu that opens, choose Map Range. The editor connects the envelope to Map Range Input. The envelope still drives the VCA too: one output can feed many inputs.
- Connect Map Range Result to Filter Cutoff.
- On Map Range, drag the two Out handles until the range reads 200 Hz to 5000 Hz. Leave In at 0–1.
The envelope moves between 0 and 1, but Cutoff is in hertz. Map Range turns the envelope into 200 Hz when the note is silent and 5000 Hz at the envelope's peak, so you choose exactly how far the filter opens. See Modulate a parameter.
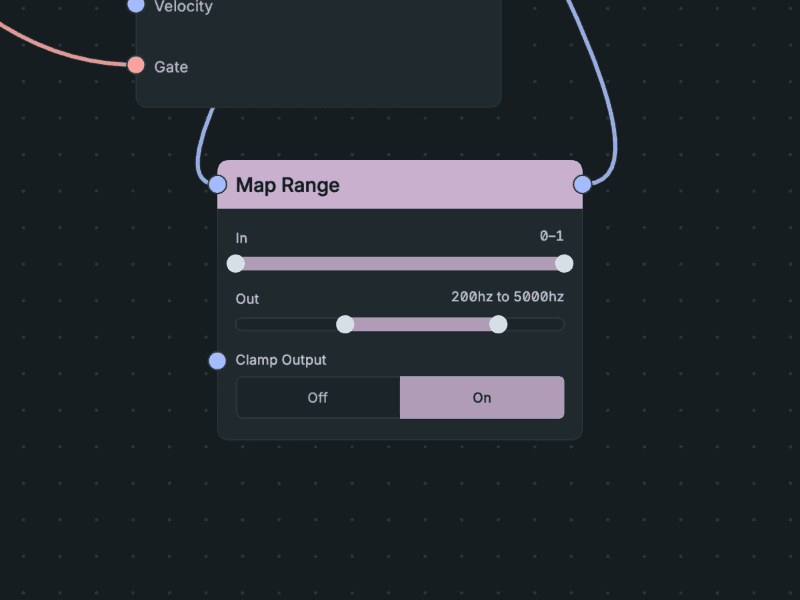
Map Range up close: In 0–1 from the envelope, Out 200 Hz to 5000 Hz for the Filter's Cutoff.
Result: each note opens bright and falls to a darker tone as the envelope settles at Sustain. Cutoff is about 3500 Hz while you hold a key, and closes to 200 Hz as the note releases.
If the tone does not change: check that Map Range Result goes to Cutoff, not to Resonance or Mix. While a cable drives Cutoff, the Cutoff slider no longer moves when you drag it: the cable sets the value.
Checkpoint: build-a-synth-shaped-voice.tlpatch
Lesson 3: Play chords
So far one voice plays one note at a time. A Polyphony Zone runs a separate copy of the voice for each held note.
Decide which nodes belong to one note. Here that is everything from MIDI Decode to VCA: MIDI Decode, Oscillator, Filter, ADSR, Map Range and VCA. MIDI Input and Audio Output stay outside, because all voices share one note stream and one output.
- Click MIDI Decode, then Shift-click the other five voice nodes.
- Press Shift+A to open the command palette, type
create polyphony zoneand choose Create Polyphony Zone. You can also right-click one of the selected nodes and choose it there. - If the shaded Zone frame covers Audio Output, drag Audio Output to the right until it sits outside the frame.
- On Oscillator, set Amplitude to 30%.
When you create the Zone, Throughline replaces MIDI Decode with the Zone's Polyphony Input. It sends Pitch and Gate to each voice. Polyphony Output on the right edge adds the voices together and sends them on to Audio Output.
The frame follows cables, not position. A node belongs to the Zone because of how it is connected, so moving Audio Output only tidies the picture. If you later connect a new node into one of the voice's inputs, the Zone adopts it: it becomes part of the voice and runs once per note. See Polyphony.
Every voice adds to the output level, so lowering the Oscillator's Amplitude leaves headroom for chords. At 50%, a three-note chord clips the output.
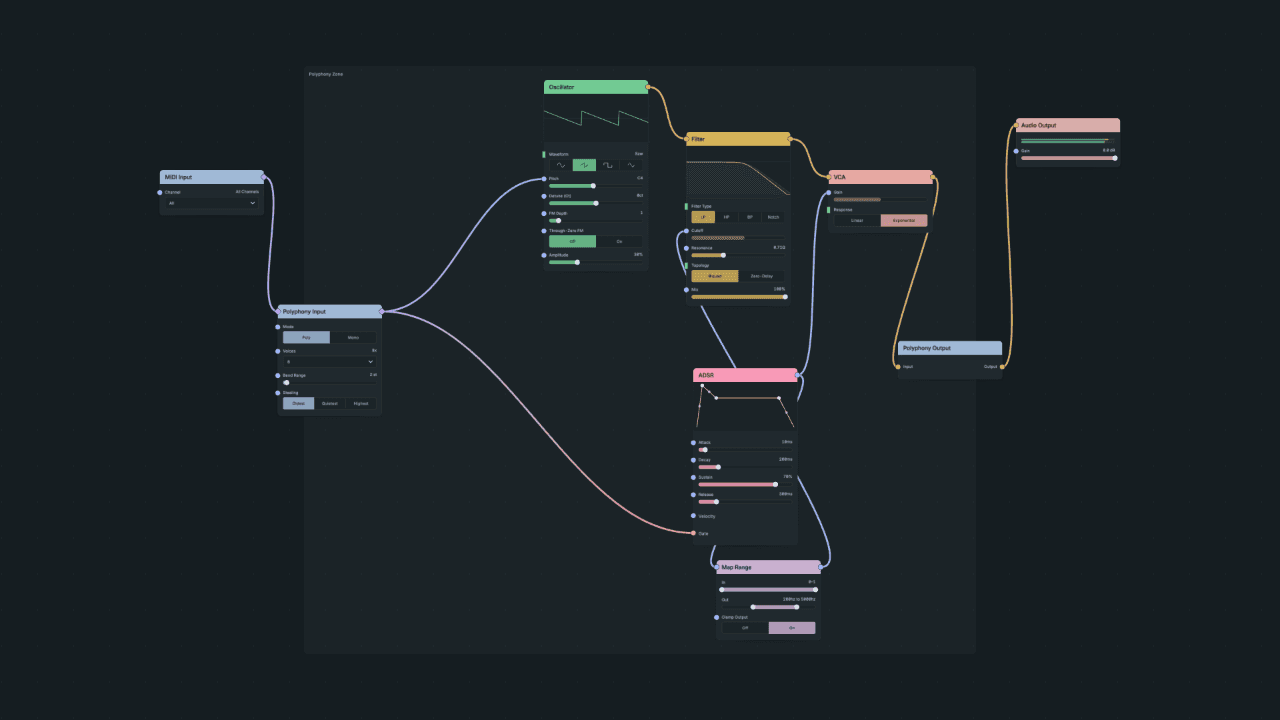
Result: play a chord. Each note has its own envelope and filter sweep. Release one key and the other notes keep sounding. The Zone plays up to eight notes at once; change Voices on Polyphony Input for more or fewer.
If Create Polyphony Zone is missing: the selection probably includes a node that receives audio from outside it. A Zone accepts notes, not audio. Select only the six voice nodes and try again.
Checkpoint: build-a-synth-polyphonic.tlpatch
You now have a working synth. Save your DAW project. The next two extensions are optional.
Extension: Add an arpeggiator
A MIDI Arpeggiator plays the notes you hold one after another, in time with a clock.
Starting checkpoint: build-a-synth-polyphonic.tlpatch
- Zoom in on the cable from MIDI Input to Polyphony Input until its + appears. Click it, type
arpeggiatorand choose MIDI Arpeggiator. - Throughline also adds a Clock and connects it to the arpeggiator's Clock input. If the patch already had a Clock, the editor reuses it instead.
- On the Clock, set Source to Host.
- Start your DAW's transport, then hold a chord.
The arpeggiator sits before the Zone, so it sends one note at a time into the voices. Its defaults are Direction up and Subdivision 1/8.
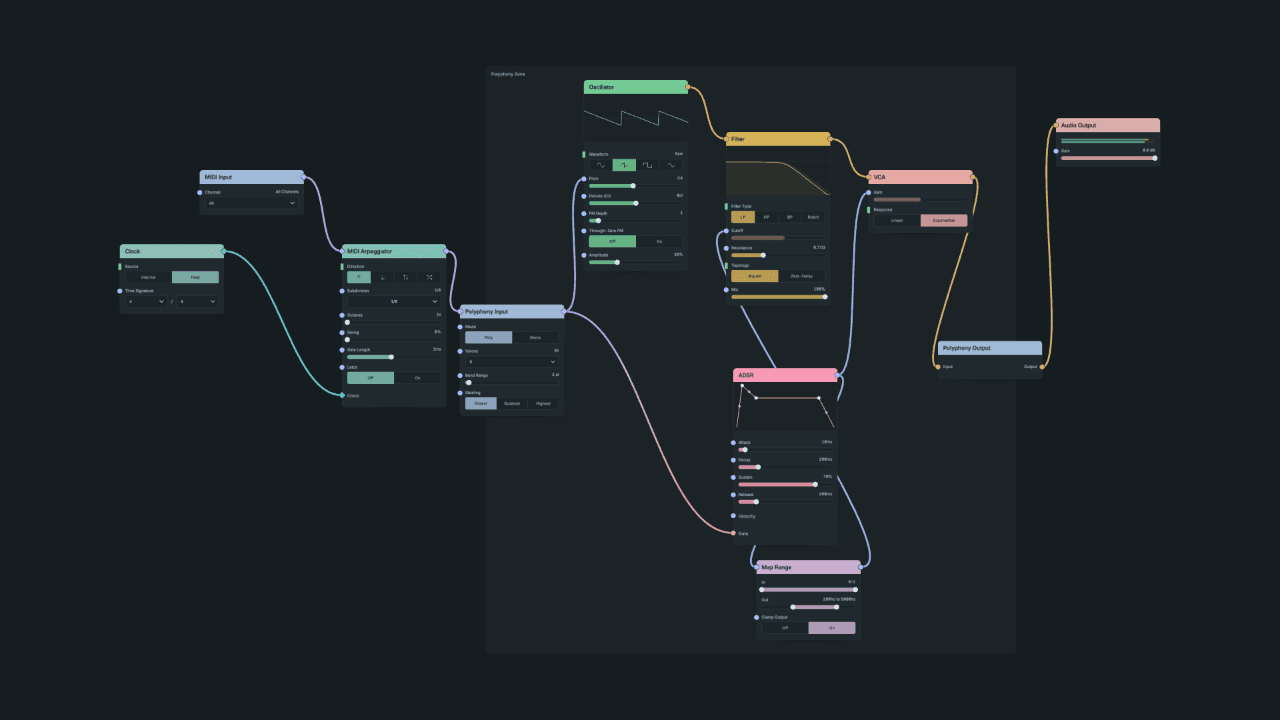
Result: the held notes play one at a time from lowest to highest, as eighth notes at your DAW's tempo. At 120 BPM they are 0.25 s apart. When you stop the transport, no new notes start.
If nothing plays: check that the DAW transport is running. With Source set to Host, the Clock follows the transport and stays silent while it is stopped. To play without the transport, set Source to Internal and choose a BPM. See Timing and sync.
Checkpoint: build-a-synth-arpeggiator.tlpatch
Extension: Add and sync a delay
A Delay repeats the sound. Put it after the Zone, so all voices share one delay instead of getting one each.
Starting checkpoint: build-a-synth-arpeggiator.tlpatch. If you skipped the arpeggiator, start from the Lesson 3 checkpoint and see the note before step 6.
- Click the cable from Polyphony Output to Audio Output to select it, then press Option+Shift+Delete (macOS) or Alt+Shift+Delete.
- Drag Audio Output to the right to make room.
- Add a Delay between them.
- Connect Polyphony Output Output to Delay Audio In, and Delay Stereo Output to Audio Output Audio In.
- Set Delay Time to 300 ms.
Delete the old cable before you connect the Delay, so the synth reaches Audio Output only through the Delay.
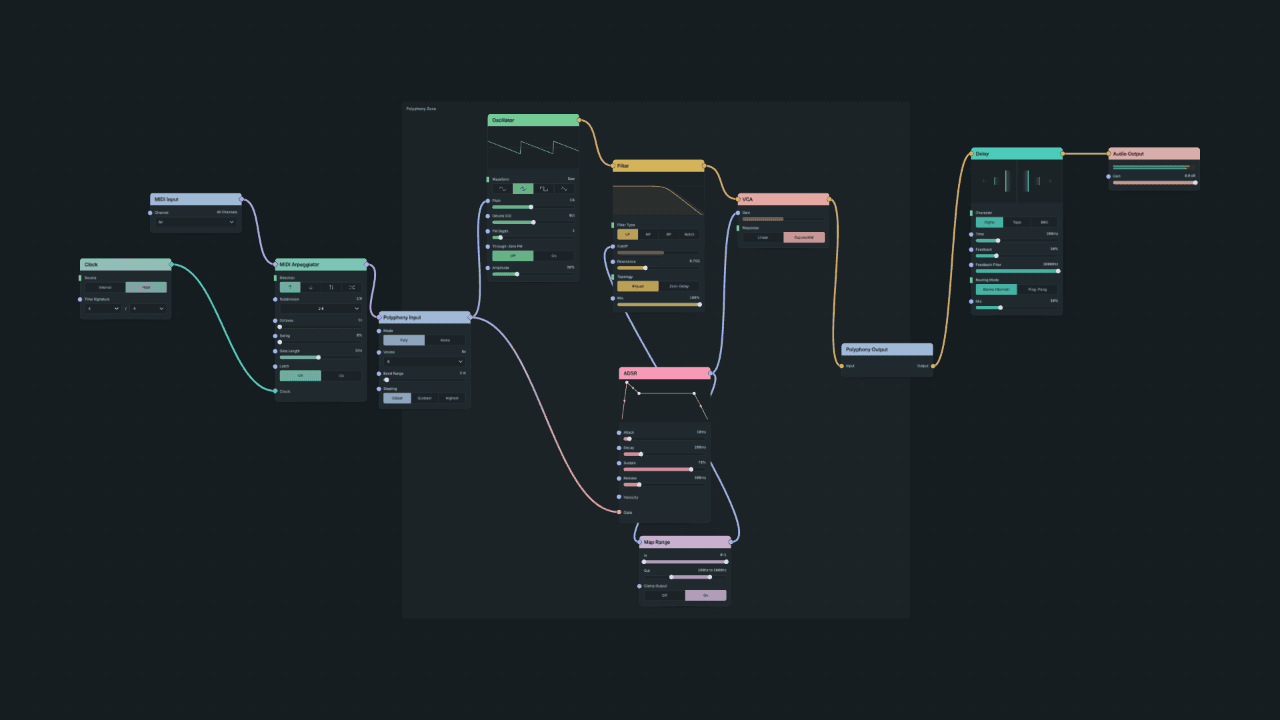
Result: each note repeats every 300 ms and fades away. At 120 BPM the eighth notes are 250 ms apart, so the echoes drift against the beat.
Checkpoint: build-a-synth-delay.tlpatch
Now make the echoes follow the tempo:
If you skipped the arpeggiator, the patch has no Clock yet. Add a Clock with Add node and set its Source to Host, then continue with step 6 to connect it to the Delay you already have.
- Drag from the Clock's Clock output to an empty part of the canvas and choose Clock Divider. The editor connects the Clock to it. Its Division is 1/4 and Type is Note.
- Connect Clock Divider Clock to Delay Time.
Delay Time now shows 1/4: the delay takes its time from the Clock instead of the milliseconds setting.
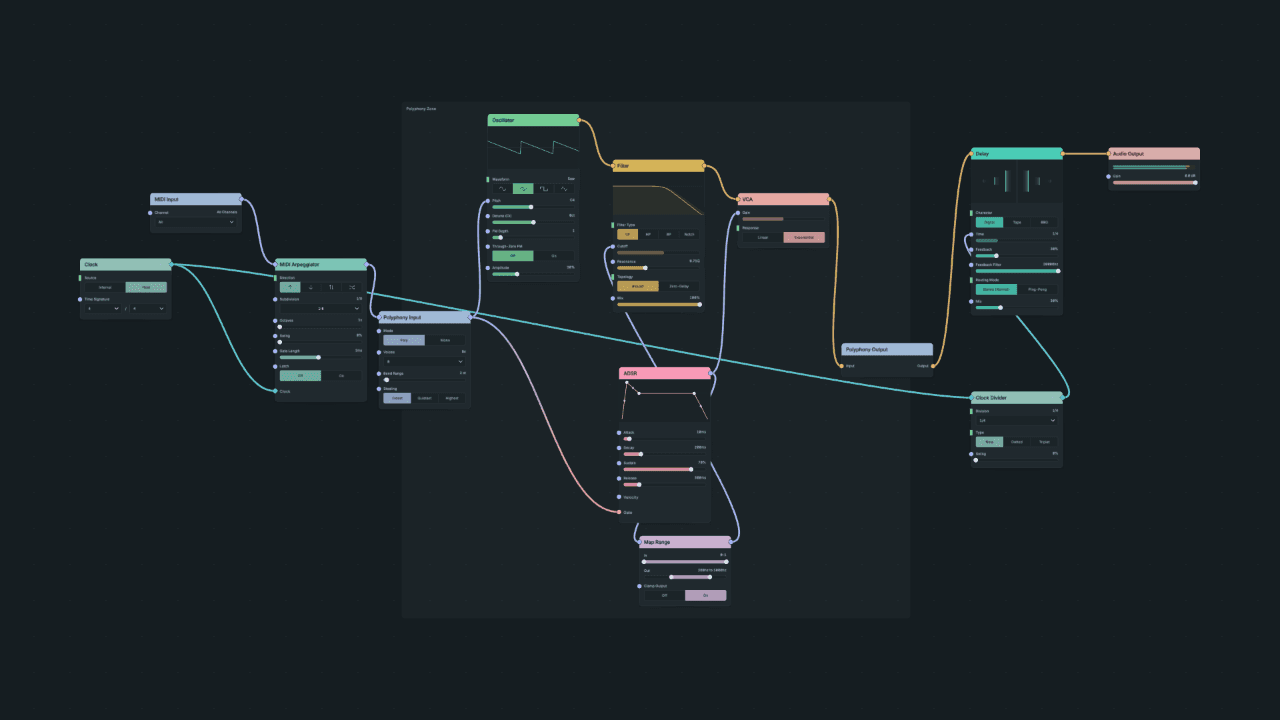
Result: the echoes land on quarter notes: 0.5 s apart at 120 BPM and 0.667 s apart at 90 BPM. Change the DAW tempo and the echoes follow.
If the echoes ignore tempo changes: check that Clock Divider Clock goes to Delay Time, and that the Clock's Source is Host. An Internal Clock uses its own BPM.
Checkpoint: build-a-synth-synced-delay.tlpatch
Where to go next
- Polyphony explains voice controls, sustain and pitch bend.
- Timing and sync shows the same Clock pattern for LFOs and other timed nodes.
- Modulate a parameter adds movement with an LFO.
- Macros and DAW automation puts the controls you use most on dials your DAW can automate.